In my previous post I described how to configure Salesforce.com to accept API connections, and how to set up Visual Studio 2010. In this next section we will begin with the actual coding in C# to connect to Salesforce.com through the API.
Step 1 – Adding the API
Before we can do much else we must be able to log into the Salesforce.com instance. To accomplish this there are several things we must do. First we must add the Salesforce.com API Web Reference to our Default.aspx page. In C# we do this using the “using” reference at the top of the class. From the Solutions explorer expand the Default.aspx page and select the Default.aspx.cs sub element which is the C# code behind page. In the source code editor add the reference to “apex” with the using statement.
using SFDC_Plugins.apex;
This will make all the objects and methods of the Salesforce.com API available to our page. Note that you must use the Project name (SFDC_Plugins in this case) then the Web Reference. Another less common method is to use the Project Name plus the reference (“apex” in this example) and then the method, class or property you wish to use. This is not the preferred method, but if you have similar named objects (such as an “Account” object) this may be a better approach to help you keep track of which object does what.
There are three elements to a Salesforce.com Login that we must pass to the API. They are the username, password and the security token we generated earlier. The trick is that the login method does not include a reference for the security token, instead the token must be appended to the end of the password (if you’ve used the Data Loader for Salesforce.com you’re probably familiar with this).
Since this page is going to log in automatically we need to store the username, password and token in a location to keep them…we also cannot use the registry as we do not know about the security of the target platform. So let’s add them to the Web.config XML document of our website. Since these keys will be present in both Web.config files (in Visual Studio 2010, if you’re not using it, it has both a .debug.config and a .release.config), we will just select the Web.config and add the keys to the .
* NOTE : we can encrypt these values a number of ways, but I’ll leave that up to you to figure out.
With these keys in place we are now ready to create the login code in our application. First let’s add some class global variables to store our Salesforce.com values to, as they may be needed in numerous methods:
private SforceService binding = null;
private LoginResult loginResult = null;
private String un = "";
private String pw = "";
private String token = "";
The first two variables require a bit of explanation, while the last three are obviously string variables to hold the username, password and token. The SForceService is a connection to the Salesforce.com API and the LoginResult object is designed to hold information about the success or failure of the login attempt. Now next we need to add a few items to our Default.aspx page.
Several things are needed. First we need to add several link buttons which will perform the login and then query the Salesforce.com Account Object or Contact Object depending on the request.
<p>
    To test the SFDC Account Viewer <asp:LinkButton ID="LinkButton1" runat="server" OnClick="ExecuteTestAccount">Click Here</asp:LinkButton>
</p>

<p>
   To Test the SFDC Contact Viewer <asp:LinkButton ID="LinkButton2" runat="server" OnClick="ExecuteTestContact">Click Here</asp:LinkButton>
</p>
Once we add the LinkButton(s) we also need to define what happens with the OnClick Method. Best way to define the Link button event is to use the designer and double click on the button. This will open the source code editor with a blank method named “ExecuteTestXXXX” depending on which one you click on.
protected void ExecuteTestAccount(object sender, EventArgs e)
{
    // Add your code to handle account
}
We also need to add a table element to hold the results and literal controls within the table (for us to write the output HTML).
     <h1>Account Activity</h1>
     <table width=100% border=1>
        <tr>
             <td>Activity Date</td>
             <td>Type</td>
             <td>Status</td>
             <td>Task Type</td>
             <td>Assigned To</td>
             <td>Description</td>
        </tr>
        <tr>
             <asp:Literal ID="resultTable" runat="server"></asp:Literal>
        </tr>
     </table>
Lastly we need to use <div> tags to hide and show the results table and other elements on this page. The trick to making HTML tags controllable in .NET is to set the runat property to be “server” and then assign the control id property. For example, we need to change the title from “Account Activity” to “Contact Activity” when we are getting Contact activity. So, we need to change the <h1> tag to be like the following:
<h1 id="TableHeader">Account Activity</h1>
Then in our source code we can now change the content of the <h1> tag like so in our code:
this.TableHeader.InnerText = "CONTACT ACTIVITY";
This trick works for any of the HTML controls that will be run in .Net. For example we need to hide the table until the user makes a selection. To do that we use the <div> tag and apply the same trick, with one caveat, we need to set the property “visible” to false.
<div id="ActivityDiv">… table code …</div>
By naming the <div> tag (via the id property) we can now hide or show the table from our source code, which we need to do after we write out the Activity data.
this.ActivityDiv.Visible = true;
So now that we have an understanding of what the HTML of the page should look like here is the final version of the Default page:
    <h2>
        Salesforce.com Web Service Test
    </h2>
    <p>
        To test the SFDC Account Viewer  <asp:LinkButton ID="LinkButton1" runat="server" OnClick="ExecuteTestAccount">Click Here</asp:LinkButton>
    </p>
    <p>
        To Test the SFDC Contact Viewer  <asp:LinkButton ID="LinkButton2" runat="server" OnClick="ExecuteTestContact">Click Here</asp:LinkButton>
    </p>
    </div>

    <div runat="server" id="ActivityDiv" visible=false>
        <h1 runat="server" id="TableHeader">Account Activity</h1>
        <table width=100% border=1>
            <tr>
                <td>Activity Date</td>
                <td>Type</td>
                <td>Status</td>
                <td>Task Type</td>
                <td>Assigned To</td>
                <td>Description</td>
            </tr>
            <tr>
                <asp:Literal ID="resultTable" runat="server"></asp:Literal>
            </tr>
        </table>
    </div>
The final result in the Designer should look like this:
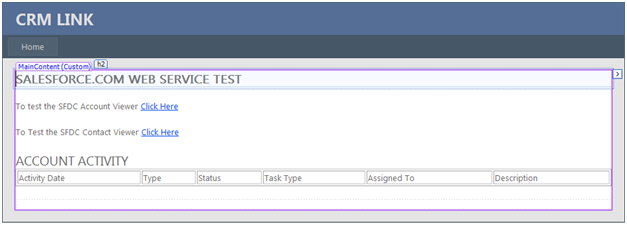
A couple of final notes: the “Click Here” links will only appear if the Default.aspx page is called with no parameters, and the “ACCOUNT ACTIVITY” header is part of the ActivityDiv tag which means that by default it is not visible.
Now we will need to qualify the data being requested by adding some parameters to the query of the page. Essentially if no parameters are passed with the page (in this case Default.aspx) then we will display the links, otherwise they are making a request and we need to process that request. We will require two parameters. First will be a type of request identifier (type=A for Account or C for Contact), second will be the id of either the Account or Contact depending on Type.
protected void ExecuteTestAccount(object sender, EventArgs e)
{
   // Reload the page
   // NOTE : 001A000000CMd52IAD is an ID that already exists in the Account table
    Response.Redirect("Default.aspx?type=A&id=001A000000CMd52IAD");
}

protected void ExecuteTestContact(object sender, EventArgs e)
{
    // Reload the page
    // NOTE : 003A000000CJ0utIAD is an ID that already exists in the Contact table
    Response.Redirect("Default.aspx?type=C&id=003A000000CJ0utIAD");
}
Now to process the parameters we must modify the page load event and check for their existence.
if (Request.QueryString.Count > 0)
{
     // We should have two values
     if (Request.QueryString["type"].ToString() == "A")
     {
          m_AccountId = Request.QueryString["id"].ToString();

          // Account Activity
          ViewAccountActivities();
     }
     else
     {
          m_ContactId = Request.QueryString["id"].ToString();

          // Contact Activity
          ViewContactActivities();
     }
}
We now have the template for how our application to process the Activities. Before we can generate a view of anything from Salesforce.com we need to perform a login(). To log in we need to retrieve our username, password and token form the Web.config file. To do this we add the System.Configuration assembly to the application. We include the System.Configuration by adding it to the project as a reference.
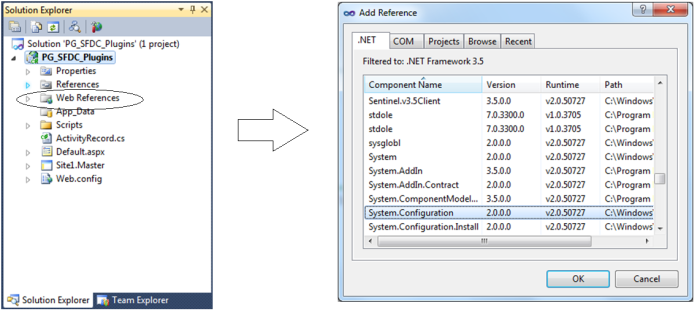
To add a reference to the System.Configuration we must select the References section of the project.
Right click on the Reference Section (or select the Project->Add Reference menu option). This will open the add references dialog. Select the .NET tab, and scroll down to the System.Configuration option.
When you select the System.Configuration assembly it will now show up in the Solutions Explorer. Finally, we must also include it in our page code window with the using statement at the top of our Default.aspx page.
using System.Configuration;
We are now ready to retrieve our variables (which are stored in the pre-defined section “AppSettings”) we invoke the ConfigurationManager object.
// Load Username, Password and Security Token
un = ConfigurationManager.AppSettings["SFDCUser"].ToString();
pw = ConfigurationManager.AppSettings["SFDCPwd"].ToString();
token = ConfigurationManager.AppSettings["SecurityToken"].ToString();
Now we need to establish a connection to the Salesforce.com API.
binding = new SforceService();

// Time out after a minute
binding.Timeout = 60000;

loginResult = binding.login(un, pw + token);

String sessionId = loginResult.sessionId.ToString();
String serverUrl = loginResult.serverUrl.ToString();

//Change the binding to the new endpoint
binding.Url = loginResult.serverUrl;
Once we have a connection we can now use this connection to query the objects within this instance of Salesforce.com. In order to continue you must have a Session ID. The login method will return the Session ID, which this application will need to use. This Session ID becomes more important as you do more, but the current application doesn’t do too much with it. However, it must be stored as it is passed with each API call. Even though you may not actively use this information, it can be passed passively with each request so it needs to be set. If you do not then the application will error.
//Create a new session header object and set the session id to that returned by the login
binding.SessionHeaderValue = new SessionHeader();
binding.SessionHeaderValue.sessionId = loginResult.sessionId;
Although it is not used in this project you will also see a reference to GetUserInfoResult. This object stores specific user information.
GetUserInfoResult userInfo = loginResult.userInfo;
We also need to add a check for login success. We must successfully log in to Salesforce.com before we can move on to select the Activity information. This flag will get set in the Login method.
The final login code when we put it all together.
protected void Login()
{
    // Load Username, Password and Security Token
    un = ConfigurationManager.AppSettings["SFDCUser"].ToString();
    pw = ConfigurationManager.AppSettings["SFDCPwd"].ToString();
    token = ConfigurationManager.AppSettings["SecurityToken"].ToString();

    try
    {
        binding = new SforceService();

        // Time out after a minute
        binding.Timeout = 60000;

        loginResult = binding.login(un, pw + token);

        String sessionId = loginResult.sessionId.ToString();
        String serverUrl = loginResult.serverUrl.ToString();

        //Change the binding to the new endpoint
        binding.Url = loginResult.serverUrl;

        //Create a new session header object and set the session id to that returned by the login
        binding.SessionHeaderValue = new SessionHeader();
        binding.SessionHeaderValue.sessionId = loginResult.sessionId;

        // GetUserInfoResult userInfo = loginResult.userInfo;

        // Set Logged in Flag
        loggedIn = true;

    }
    catch (System.Web.Services.Protocols.SoapException exSoap)
    {
        // This is likley to be caused by bad username or password
        throw exSoap;
    }
    catch (Exception ex)
    {
        throw ex;
    }
}
We are now ready to move on to creating the Activity View.
Up Next… We finally query some records and process the results.
Filed under: Salesforce.com Programming, Uncategorized 
![]()