Once you have a login for Spring CM and connection established with Salesforce (if you do not have a connection to Salesforce setting it up can be found here – https://support.docusign.com/en/guides/SpringCM-for-Salesforce-Administrator-Guide) you will need to do several things:
- Upload the Word Document Template
- Create the Form to fill in the Word Document
- Edit the Word Document to have the field tags
- Download and install Spring CM Edit (which is just a bridge to open Word and download/upload a version of the Document)
Step 1 – Uploading a Word Document. NOTE – you cannot perform ANY of this if you are not configured to be Super Administrator on Spring CM. To verify this click on the Icon of the person in the upper right.

NOTE : Super Administrator and the owner of the Organization. The value after the “-“ (in this case 11510) is the User Code you will need if you call Tech Support.
From the main home screen you can create a folder and upload a Word document to the folder.

Select the Folder and then it will open to display any files currently in the folder.

To upload a file click on the File menu in the upper left below the DocuSign Logo

Select “Upload” and the file will be transferred.
Step 2 – Create the Form. Now that the document has been upload it’s time to create the form. The form is essentially nothing more than defining the custom tags (Merge fields in Salesforce speak) that will be embedded into the Word Document. Select the “Admin” Option from the Main menu bar.
This will open the Document Generation (by Default the first time) and display any “Configurations”.

Configurations can be confusing because you need a form before you can have a configuration. Also the documentation talks about using XML documents to control the fields rather than explaining that the XML document is created by creating a Form. To create a Form click on the “Forms” tab next to “Configurations”.
Select “Create Form”
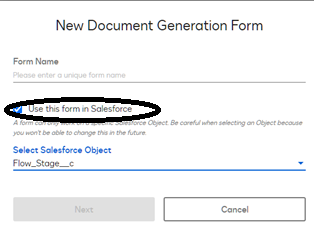
Next fill in the New Document Generation Form options. Give it a Name.
Then select “Use this form in Salesforce” and Select the Salesforce.com Object (this is the object you connected in the setup found in the Admin guide)
This will open a blank canvas for you to add fields to.
Select the Add Fields button. Then choose the type of field to add. The selection of the field is important. If you choose to add a Text field numeric fields will not appear in your list of available fields. When you select the field type and add it to the form you will see the field Options.
Fill in the Field Name. If the field is one you will fill from Salesforce in the Field Value section select the “Link to Salesforce Field”. Then you click on the cloud and it will open the field selection form.
Notice that related objects will appear, however ONLY field types that match the selected Field (text in this example) will appear in the related objects. Also the relationships are not clearly defined as to what type will work. So far Lookups work, but Master Detail (if the object is the child of the detail it might work, but usually it doesn’t). Once you select the field it will be added to the form and linked to Salesforce. Fields added to the form with No Salesforce.com link will be text entry fields which can still be used to copy data into a document but that data is lost after merge.
When the form is completed you will have something that looks like the following :
Step 3 – Copy the Merge Tags. Now that the fields have been created and Saved the form is ready to be linked to a document. Seems simple enough, but not quite. In order to link the form we must return to the configuration screen. Click on the Configuration Tab.
Select “Add Configuration”. Once you open the Add Configuration screen you will need to make some entries. Most will be self explanatory but a few may not be.
First set the “Where to use this Configuration” option to “In Salesforce”. Then select the linked Object. Now you have the configuration set to tie back to Salesforce, so we need to add the fields and word document to use to the configuration. Select the “Add Template” option.
Select the “Create a Document” option. This form can be a bit confusing as you would think here would be where you would upload a document. However, in this case Uploading a document is really one pertaining to a manually created XML document or sxformconfig file data type and not a Word Document to be utilized as a template.
Name your template. Then you must fill in the Configuration Files section. Section one is the name of the XML configuration file to use. This is another confusing entry but don’t worry that is really the name of the Form we created earlier. Select the “Change File” button in the “Form Configuration File” section.
You will then be shown a screen to choose an XML or sxformconfig file. Under the Forms option on the right the name of the form you created earlier will appear. Select that form and Choose Apply. This will link the form to the configuration.
Next click on the “Change File” option for the “Document Template File” option. This will open the Choose a PDF of Word Template option.
In this Choose PDF or Word Template window navigate to the folder where you uploaded the Word Document back in Step 1. Select the Word Document you uploaded and click Apply.
Finally your configuration will be complete. This is what the final Document Generation Configuration screen should look like
Select the “Copy URL” menu option to copy the URL generated by the configuration. Now we are ready to add the button to Saleforce.
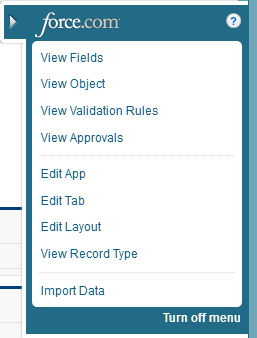
Log in to Salesforce and go to the Object. I use Classic as it is easier to navigate to the Object by going to the tab (Case Batch Requests in this example) and selecting the pop out menu on the form:
Select the “View Object” option. This will open the Setup form. Scroll down through the Object configuration to the Buttons, Links and Actions Section. Click “New Button or Link”.
Fill in the Label, set the Type as Detail Page Button, set it to the behavior to Display in a new window, and the Content Source as a URL. Paste the copied URL into the Source Text box. Click the “Save” option and the button has been created. This does not add the button to the form. In order to add the button to the form, we must now locate the “Page Layouts” section.
Select the Page layout and click the “Edit” hyperlink to open it. When the form editor opens select the “Buttons” section.
Then drag the button onto the form.
Once added to the form when you click on the button the DocuSign engine will launch the Form you created.
Step 4 – Download and Run Spring CM Edit. To find all the information on how to configure the Spring CM Edit (https://support.docusign.com/en/guides/SpringCM-Edit-User-Guide)
You can go to this location to download the Spring CM package:
https://docs.docusign.com/supportdocs/SpringCM/Content/scm-edit-download.htm
It’s also important to note that current development of the Spring CM application in this example is being done in a Spring CM UAT sandbox. So in order to modify the Spring CM Edit option follow the instructions found here:
https://docs.docusign.com/supportdocs/SpringCM/Content/scm-edit-toggle-uat-prod.htm
[contact-form]


